Very often, when it comes to actually getting a program up and running, the simple-minded approach turns out to be the one that works best. — Dan Fylstra (Write Your Own Assembler)
- Reduce File Size Update for Sequoia—Wednesday, May 21st, 2025
-

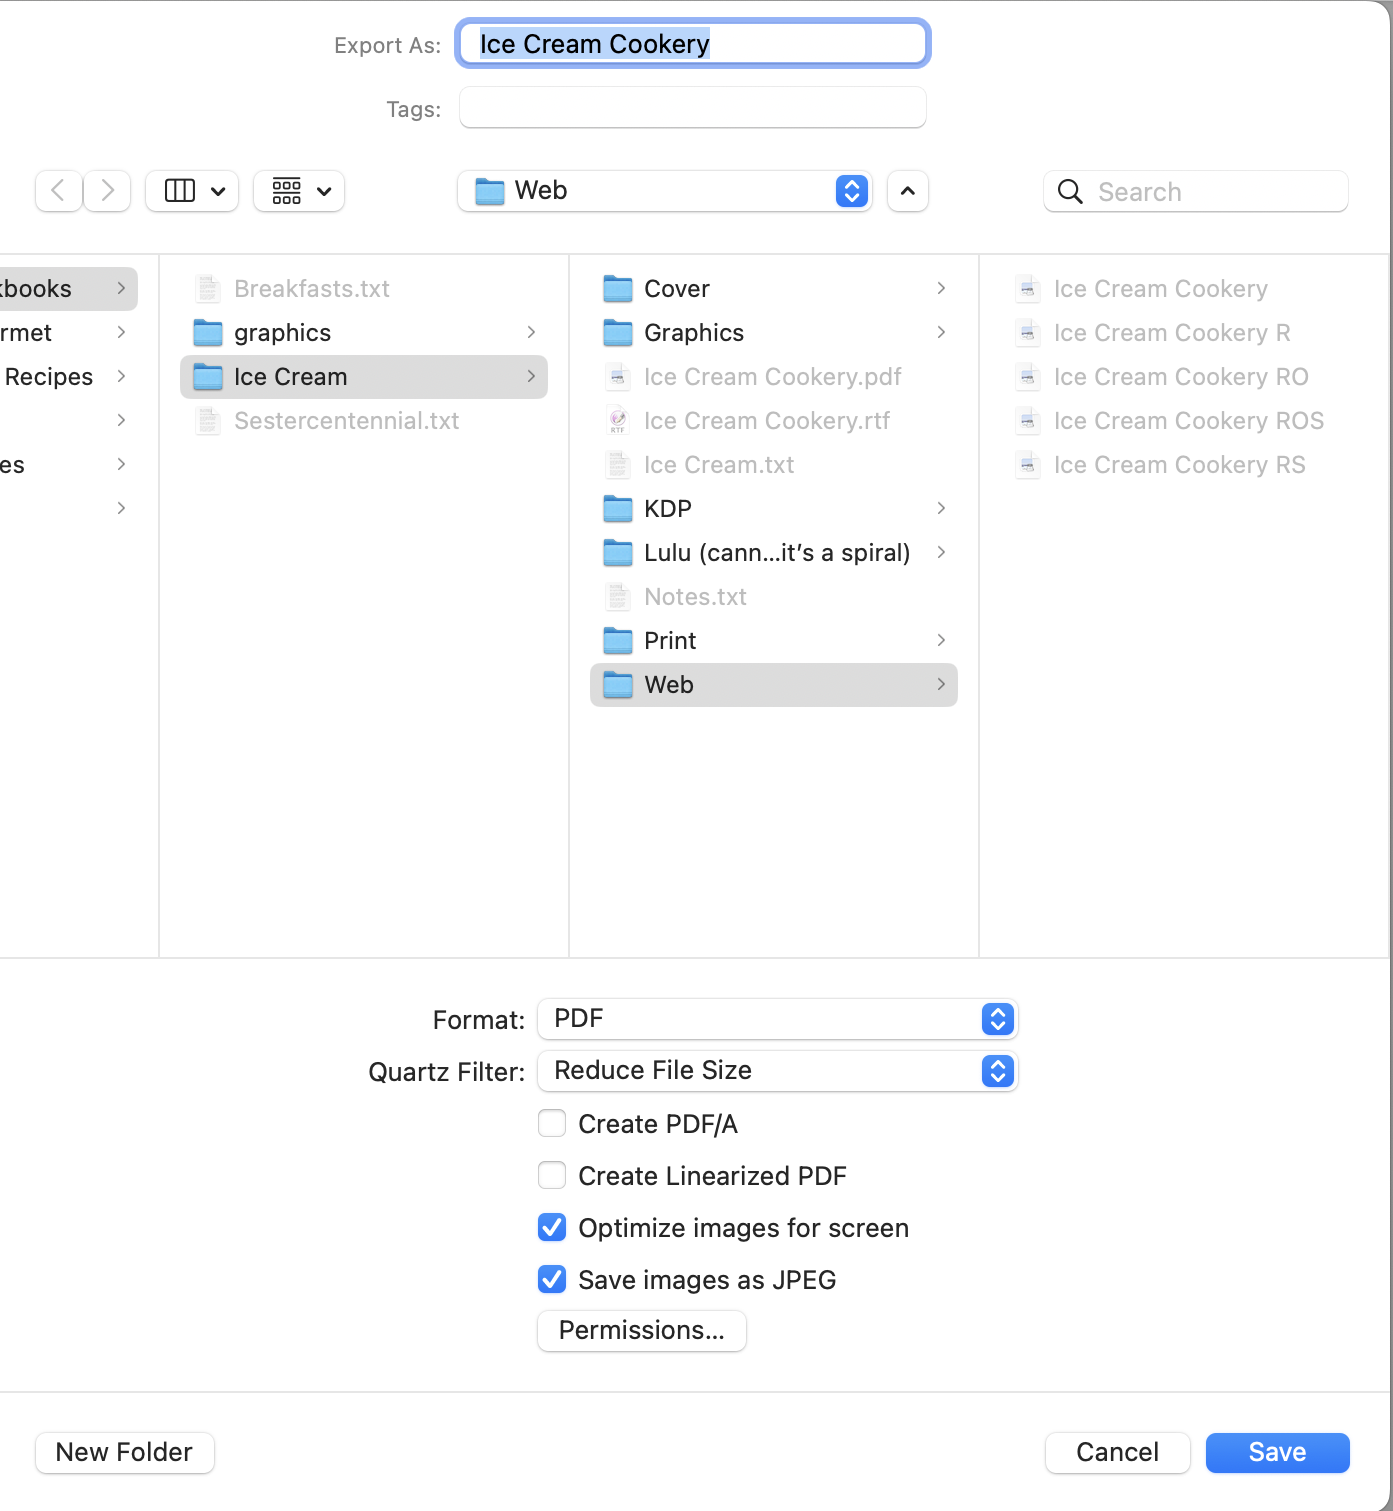
To get the built-in Reduce File Size Quartz Filter to reduce file size, I also have to check “Optimize images for screen”.
One of the most popular pages on my site is how to create a Reduce File Size Quartz filter. Sadly, while it appears to be still recommended by many people, it hasn’t worked for me for a long time. But I recently decided to write a color cookbook and I wanted to make the PDF available for download.
I don’t like having multiple sources for multiple destinations. That way lies madness. I want the same source to provide for different destinations. But the file destined for print1, because this book is focused as much on the images as on the recipes, was large even for modern downloads. If it turns out to be a tenth as popular as Quality Reduced File Size I don’t need people downloading hundreds of copies of a 34 megabyte file every day.
So I decided it was time to take a look at why Quartz filters stopped working so long ago, or at least how to get them working again. To be honest, I’m still not sure what’s going on. But I was able to get the stock Reduce File Size filter working again.
The executive summary is that I have to turn on Optimize images for screen if I want Reduce File Size to actually reduce file size. Read further for what I discovered in greater detail, as well as advice if you have multiple copies of your aging custom quartz filters.
First, Quartz filters no longer show up at all on Print, even from Preview. I have to open the PDF in Preview and choose File:Export to get the list of filters. Even then, though, if I just choose “Reduce File Size”, the resulting file is always exactly the same size as the starting file.
Apple’s help page says that, to reduce file size, you have to:
Do one or more of the following:
- Compress PDF graphics to presentation quality: Select the “Optimize images for screen” checkbox.
- Convert all graphics to JPEG format: Select the “Save images as JPEG” checkbox.
- Save That Thou Art—Wednesday, April 9th, 2025
-
There are several hymns sung to the tune of the “Irish folk melody” Slane. It’s a storied tune, supposedly named after the Irish Hill of Slane were St. Patrick “lit an Easter fire in defiance of the pagan king Lóegaire”. It’s also very evocative. I first heard the tune in Lord of All Hopefulness, which ends each line with a countdown of the passing day: the break of the day, the noon of the day, the eve of the day, and the end of the day.
But my favorite is Be Thou My Vision, using words translated from a much earlier Irish poem. The original is, by tradition, attributed to the Irish poet and saint Dallán Forgaill. According to online sources, Mary Elizabeth Byrne translated “Rop Tú Mo Baile” from a Middle Gaelic poem to an English-language poem, and published it in 1905. Eleanor Hull “versified” the poem in 1912, though I can’t see whether she was versifying Byrne’s translations or going back to the original Gaelic.1
It’s not just that this earlier date puts it into the public domain that makes it my favorite—although that helps! As much as I enjoy Lord of All Hopefulness, there’s something contrived about its lyrics. In contrast, Be Thou My Vision is heartfelt and simple.
Looking at the various versions, the conversion from poem to hymn is an interesting class in how to translate a very personal prayer into a hymn to be sung during Catholic Mass.
- The Soul Felt It’s Worth—Wednesday, December 20th, 2023
-

Earlier this year I discovered the Brian Setzer Orchestra’s Boogie Woogie Christmas at a garage sale in Michigan. Their version of O Holy Night reminded me just how wonderful and inspiring a song O Holy Night is. And after a difficult year, how much it expresses the yearning and emptiness that celebrating Christmas both secularly and religiously can fill.
- Long lay the world in sin and error pining,
- Till He appeared and the soul felt its worth.
“A thrill of hope, the weary world rejoices…” Some Christmases we need the opportunity for rejoicing more than others.
There are three verses, but in my experience, “O Holy Night” is almost always sung with only the first verse. Partly I suspect that’s because the second and third verses don’t scan very well, and in addition the third verse’s mention of slavery is viewed as somewhat outdated. The line wasn’t initially directed at American slavery: the original lyrics were French. They were written in after the French revolution, in 1843; my guess is that the slaves in the lyrics almost certainly referred to French citizens, no longer slaves of the King and other royalty.
The lyrics were translated into English by Bostonian John Sullivan Dwight in 1855. Dwight’s translation is very loose, but the original third verse’s “Il voit un frère où n’était qu’un esclave…” tracks very closely with Dwight’s “for the slave is our brother”.
I can find no evidence that Dwight was an ardent or even occasional abolitionist. He was a music critic and magazine publisher. He did, apparently, include “the music of black Americans” in his magazine when submitted. The 1855 volumes of his magazine, if the Internet Archive’s OCR is to be trusted, contain no mention of “abolition” other than one about “the abolition of the mock auction system” in the selling of concert tickets and another about the “total abolition of hymn books”. The only mention of “negro” is in reference to music.
- Padmath in Ventura—Wednesday, September 27th, 2023
-

I apologize for putting this off for so long; I’ve been expecting to see more changes that need to be made in scripts after upgrading to Ventura, because this is hardly worth a post. But it could be very annoying if you’re relying on padmath.
Padmath stopped working after upgrading to Ventura. I noticed that very quickly—it’s one of my most commonly-used Services. But it’s a simple fix. The version of
bcon Ventura now has anabsfunction. This means thatabsis now a reserved word, and cannot be used to create a custom function.Since the custom function was just a means of adding an
absfunction anyway, delete the lines that define the customabsfunction and padmath will start working again.[toggle code]
-
define abs(value) {
-
if (value < 0) {
- return -value
-
} else {
- return value
- }
-
if (value < 0) {
- }
I haven’t yet noticed any other issues with using the scripts under Ventura.
-
define abs(value) {

